For all tool users, it is essential to know how to wear a tool belt. Getting the right instructions will help you carry the tool belt with much comfort. It also prevents you from putting up with severe pains and injuries.
To wear it properly, you need to choose a tool belt with loads of pockets. Essential tools also need to be put into the right position for convenience.
You should adjust the tool belt while wearing it to have the most comfort. Then, you can lock it and start your work. In this article, we will provide you with the method to wear a tool belt.
The Instructions Of Wearing The Tool Belt
The tool belt is very useful to carry a lot of tools around. In this section, we will discuss every consideration in detail to help you wear it correctly.
1. Find a tool belt with loads of pockets

Before wearing a tool belt, it is necessary to choose the most suitable one with loads of pockets. The more pockets there are, the more options you have to put tools.
While the weight of tool belts can matter at work, many choices are always an advantage while working.
There is no need to bring all of the tools at one time. Instead, you should select and carry based on the type of job. Furthermore, taking a tool belt accompanied by a good suspender would be a great solution as well.
2. Primary tools close to the dominant hand

It is better to put the most important tools close to the dominant hand in your tool belt. Thanks to that, you can take the main devices in the most convenient way.
The reason is that your dominant hand could take the item more quickly. The primary tools are also the ones that you use the most. Therefore, regular-used items should stay near your dominant side for higher productivity.
For example, a carpenter will want a straight-claw hammer within the dominant side of the tool belt.
3. Secondary tools close to the non-dominant hand
For the tools that you do use occasionally, you should put them on the other side of the tool belt. You may take these secondary tools for just sudden needs.
A multi-bit screwdriver, a plaster carving chisel, and several nails are some illustrations of the secondary tool. As a result, you will take the most advantage of the tool and hand.
3. Wear the tool belt backward
Remember to put the tool belt backward, not the front of the body. It will help you bend over more conveniently and comfortably. Some jobs might even require you to bend over very much.
If you are wearing the tool belt on the front side of your body, it will irritate you. House construction jobs require plenty of bending over during working.
The carpenter is a typical illustration. They have to put on the tool belts in that way to prevent them from getting injured.
4. Arrange the tools

An appropriate arrangement of the tools is crucial because it will help you avoid undesired injuries and redundant heaviness. Furthermore, you will not want to carry so many tools whenever you go to work.
Then, before starting any task, you have to categorize and choose the needed tools for each certain work. It will get you to have a lightweight tool belt with tools in order.
This consideration is especially essential for women to bring it.
5. Specified Place for Each Tool

You should ensure that all the tools are in specific positions.
If you put one tool in this pocket today and in other pockets after that, it would be very annoying and time-consuming to take the right tool right away. It is the reason why specified positions are important.
6. Balance the tool pockets
When you put all the tools in the belt, you should create an appropriate balance. For a two-sided tool belt, it is crucial to organize the tools equally to balance the heaviness.
Users often wear the tool belt for a very long time, so the unbalanced weight can trigger injuries on the back, the waist, or both shoulders.
A tool belt regularly carries a bulk of tools. You need to arrange the tools as they generate an equivalence. The recommendation is to take the small front pocket to keep nails and small tools.
Still, this type of pocket should feature a lid or a strap to seal them. If not, these small tools would fall out when you bend over.

7. Put on the tool belt and get it locked
Your tool belt is well prepared to work with. Put it on as you wear the normal belt. Arrange the tool belt around the waist. Lock it fit with comfort.
When the tool belt is too tight or loose, it could annoy your performance while working. Ensure that the handle and the pouch are staying on the external side of the tool belt.
If you find the belt too heavy, you need to put it on a suspender.
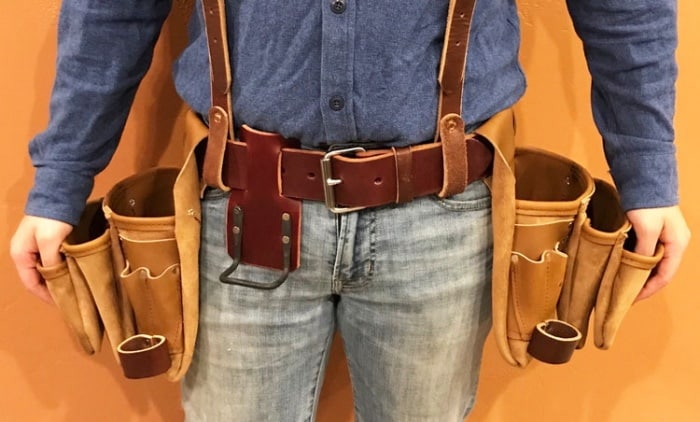
Step By Step To Wear A Tool Belt with A Suspender
When working with a bulk of tools for climbing on the high building, a suspender is a needed item for you. This item is another which helps in distributing the heaviness of the tools evenly across the body.
Bringing a large weight for a long time on the waist can lead to back and shoulder injuries, or annoyance on the upper body. It will be a great idea if you wear a suspender with a tool belt. Now, keep reading the guidelines.
Step 1 – Wear the tool belt firmly
The first thing is to put on your tool belt as normal and ensure the fitting. It is important to wear the tool belt properly on the upper body. If you do not lock the belt firmly, you can feel irritated with the suspender.
Step 2 – Wear the suspender over the shoulders
The next step is to cover the suspender over the back and the chest. You should adjust the length evenly for the most comfort.
Step 3 – Link the suspender with the tool belt
Join the two hooks on the back with the rear part of the belt. Join the other two hooks on the chest with the front part of the belt.
Look at the hooks to make sure both are equal distance. If not, the suspender will not fit. Before going to work, check again to ensure both the tool belt and the suspender are firm, not too tight, or too loose.
Both sides of the suspender are equal in length for perfect balance.
Frequently Asked Questions
If you are wondering a few confusing things, let’s look at those questions below to get the answer.
What tools can you put in the tool belt?
You need to begin with the most important items. Some primary tools that you can use to fix, repair, or do any other job consist of a claw hammer, a socket wrench, a 4-in-1 screwdriver, a running plier, and some other items in the tool belt.
There are also many secondary tools such as a steel measuring tape, marking chalk, a pencil, and some special tools like a Phillips screwdriver for typical tasks.
How can you arrange the tools efficiently?
You should organize the tools based on your requirements. The primary tool would stay in the pocket that is close to the dominant hand. Likewise, the non-dominant hand should access the small-sized and supplementary items.
Furthermore, you should choose a tool belt with a few pockets. They can be deep or have a lid to prevent small tools from falling out.
Could you put all the tools you have into the tool belt?
If you just have a small number of items, you can put all the tools in the tool belt. But people normally have many tools for their work, so it is not wise to carry all of them.
The reason is that all these tools will increase the weight. It can cause pain in your back or waist. Also, there are some redundant tools that you do not need to bring with you.
Final Words
Wearing a tool belt correctly is important to do the job, especially when you work at a high level. It will help to ensure safety, comfort, and convenience during work.
You should remember that no matter what kind of tool belt, wear it backward and make a balance to avoid the risk of getting injured in terms of the back, waist, or shoulder.
If the tool belt with loads of tools is too heavy, think about using a suspender to spread the heaviness.
It’s time for you now to put the tool belt on. Good luck!
Read more: How To Pick A ToolBox Lock?